

How To Animate Water In Still Image
Generate the expect of water rippling over a logo design and background image using wave, caustics, and racket furnishings in Adobe After Effects.
What you'll need
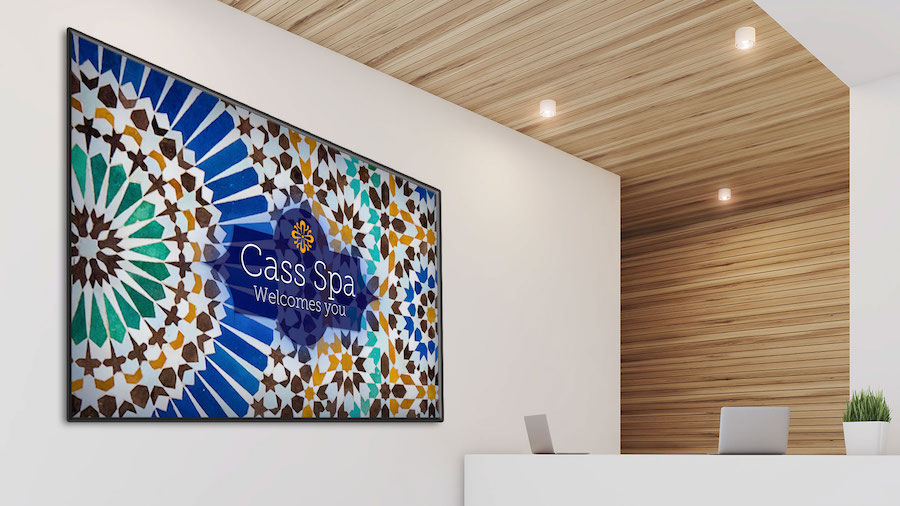
In this project, yous'll generate h2o waves above a background image that looks like an elaborately tiled swimming pool. Whatever background graphic y'all use, brand sure it'south slightly larger than your viewable area. Because the moving ridge-generation effect grabs pixels from outside the frame, it's skillful to have plenty of extra pixels to work with. Our layered "Cass Spa" sample logo design in Adobe Photoshop, for instance, is sized at 2200 10 1200 pixels for employ in a 1920 x 1080 pixel composition in Subsequently Effects.
Working in the Standard workspace in After Furnishings, cull File > Import > File and import your layered logo design from Adobe Illustrator or Photoshop as Composition - Retain Layer Sizes. Enable the Create Composition option and click Open. In the next dialog box, ensure that Layer Options is set to Editable Layer Styles and click OK. Create a new composition (Limerick > New Limerick) and gear up its dimensions to 1920 10 1080 pixels. Drag the previously created Cass_Spa composition into your new comp, turning it into a precomp. This will ingather the full-size logo design accordingly.

To add a moving ridge pattern, create a new solid (Layer > New > Solid). It should sit higher up the Cass_Spa precomp in the Timeline console. Elevate the Wave World effect from the Effects & Presets panel to the solid. Movement the playhead to the kickoff of the limerick. In the Outcome Controls panel, change the View choice to Peak Map. Expand the Simulation section and set Reflect Edges to All. Expand Producer 1. Increase the Frequency to 3 and click its stopwatch to set a keyframe. You'll want to space out the wave properties, and so motility the playhead ahead a half-second and zero out Frequency. While in that location, prepare a keyframe for Aamplitude. Move out a half-second once more and zero out the Amplitude. Later previewing your animation, move the solid below the precomp layer to hibernate information technology.

Generating realistic-looking water surfaces over the pool bottom requires adding calorie-free reflections, called caustics. Drag the Caustics effect from the Effects & Presets panel to the precomp layer. In the Effect Controls console, go to the H2o section and click open up the H2o Surface selector. Cull the layer containing the solid then fix Source to Effects & Masks. Motion the playhead about one 2d into the comp and consult the values in our example. While doing and so, prepare starting keyframes for Wave Top, Smoothing, Surface Opacity, and Specular Reflection.

Move the playhead toward the finish of your comp and prepare ending keyframe values for Wave Height, Smoothing, Surface Opacity, and Specular Reflection to attenuate the waves.

Real h2o doesn't ripple and then perfectly, and so allow's add together some noise. Drag the Turbulent Noise event from the Furnishings & Presets panel to the solid layer and so move the playhead to the start of the comp. Set up the Fractal Type to Swirly and and so lower the Contrast, increase the Scale, lower the Complication, and fix a keyframe for Evolution and one for a lowered Opacity value. Finally, fix Blending Manner to Soft Low-cal.

Motion the playhead to the end of the comp, prepare Evolution to 5x revolutions, and zero out Opacity. Preview and run into how Turbulent Noise made the ripples look more realistic.

For an added touch on, get to the Logo layer in the original Cass_Spa comp and keyframe Scale and Opacity over a second or two so that the logo scales upward and fades into view. If you don't want the water ripples to touch the Logo layer, remove it from there (Edit > Cut) and place it at the top of the master comp (Edit > Paste) so the water appears behind information technology. Because these two comps have different dimensions, the logo won't exist centered. Change its Position setting to compensate.
With Adobe Stock, you lot have access to more than 100 meg loftier-quality, royalty-free images including photos, graphics, videos, and templates to jump-start your artistic projects. Try Adobe Stock and go x gratis images.
Source: https://helpx.adobe.com/after-effects/how-to/water-ripple-underwater-effect.html
Posted by: thomascuslichavy.blogspot.com
0 Response to "How To Animate Water In Still Image"
Post a Comment